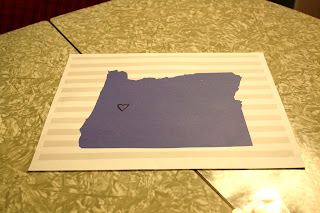
Okay, one thing about me, I love love LOVE living in the Pacific Northwest. I was born and raised in Oregon, and my heart will always be there. I recently moved to the greater Seattle, WA area, and don't get me wrong, it's great here, but I will always belong to Eugene. I wanted something to share that with anyone who decided to come visit my room so that they would know where my true home is. I just happened to see this and others on etsy, and wanted to attempt to make it instead of paying $30-$40 and waiting for it to show up at my house. So, here goes this fun tutorial on state string art!
First, you need a board. Really, you can purchase whatever size you want, but I went with a 9''x12'' board from JoAnn's, for $8. You could have your wonderful and handy father cut you a piece if you're like my friend Carly over at Ruffles & Such, but unfortunately, my dad lives right where the heart is going to go in this project, so it was off to the craft store for me!
I headed on over to Ace Hardware to pick up these little wire nails. You want nails with larger flat tops, so your string will be nice and easy to wind around. These were about $3, and I was able to make two of these projects with one box.
I also bought thick string at JoAnn's, which I didn't use for this particular board, but I did for two other ones and it worked great. For this one, I used sewing thread. I was afraid it would be really thick around the heart if I used the other thread, but it didn't matter either way, they both worked great! You just need to gather those materials, along with whatever colors you want to paint your board.
I chose to paint mine grey, because I'm planning on grey being a main color of my room eventually. I started with a black coat.
While that was drying, I had printed out an outline of Oregon found here at The Vintage Lemon (every state can be found here, so useful!) and just drew a heart over where Eugene is. This tiny heart was a little too tiny, so don't be afraid to make it big. You definitely need enough nails in the heart for a lot of string to be around them.
After that dried, which didn't take long, I set the Oregon print in the middle of the board. I've heard you can cut out the state, tape it down with painter's tape, and nail along the edges, but I did it a bit differently. I used a thicker ball-point pen and traced around the state, pressing hard, but keeping the paper in place.
See the nice indent in the wood it creates? It worked wonderfully.
Now comes the loud part. If you live in a basement with two roommates, and have a mother and 11-year-old daughter who live upstairs, don't do this late at night. Unfortunately, that's when everything dried for me, so I had to wait a whole day to finish this project! Don't you hate it when that happens? Anyway, I didn't do any measuring or anything, so I just made sure to space them far enough apart so I could easily wrap the strings around them. In this photo, I didn't pound the nails in far enough, so you'll want to do it until they're about halfway into the wood. If they're not, like mine are here, when you tightly wrap the string it'll bend the nails.
Don't forget the heart! I think it looks pretty just like this, but let's add the string.
This lighting is way better; it shows the actual color of the board. I don't have a photo of the stringing process, but it's pretty simple. I started at one corner, tied a tight knot on one nail, and started stringing it to the heart. Go back and forth hitting every outlining nail, and switching heart nails... whenever you decide to. I didn't do any special math or anything to decide which outlining nails should be paired with which heart nails, so I just winged that part.
And you're done! You can just sit it somewhere, or you could put picture hanging hooks on the back to hang on the wall. So sit it next to your glassybaby and enjoy the accomplished feeling in your heart, because you just made something beautiful.
Eventually, I'll post a few more pictures of some of my other string art projects, but some time has to pass before you get to see them! ;)


Hi Cassandra,
ReplyDeleteDo you do art for hire? I have a project where I need some string art in Eugene for a new restaurant. Please email me if interested. Katie@modpizza.com
thanks!